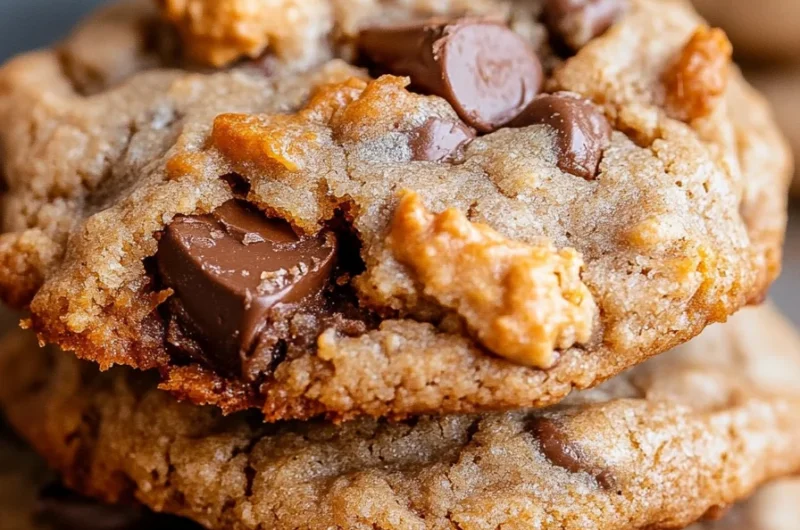
Peanut Butter Butterfinger Cookies are a fantastic twist on the classic cookie that combines the rich flavors of peanut butter with the delightful crunch and sweetness of Butterfinger candy bars. These cookies are not just a treat; they’re an experience that will tantalize your taste buds from the very first bite. Imagine biting into a soft, chewy cookie, only to be met with chunks of Butterfinger that add a wonderful texture and a burst of flavor. If you love peanut butter, chocolate, and candy, then you are in for a real treat with this recipe!
The combination of peanut butter and Butterfinger transforms a simple cookie into an amazing dessert that is perfect for any occasion—from family gatherings to cozy nights in. With their irresistible flavors and delightful texture, these cookies are bound to become a staple in your home. In this guide, you’ll discover why this recipe is so beloved, how to prepare it, and tips on serving it to impress your friends and family. So, let’s dive in and learn how to create these incredible Peanut Butter Butterfinger Cookies!
Why You’ll Love This Recipe
There are countless reasons to love Peanut Butter Butterfinger Cookies, but here are a few highlights that make this recipe truly special:
1. Simple Ingredients: Most ingredients are easy to find and might already be in your pantry, making this a convenient recipe.
2. Decadent Flavor Profile: The blend of peanut butter and chocolatey Butterfinger creates an unbeatable flavor combination that’s hard to resist.
3. Perfect for Any Occasion: Whether it’s a holiday, a birthday party, or just a casual get-together, these cookies will be a hit.
4. Crunchy Texture: The addition of Butterfinger candy adds a delightful crunch that contrasts with the soft cookie base.
5. Easy to Make: With straightforward instructions, even novice bakers can successfully whip up a batch of these cookies.
6. Versatile Recipe: You can customize the amount of Butterfinger or even experiment with different mix-ins if you want to make the recipe your own.
These factors ensure that every bite is a delightful indulgence, making it impossible not to fall in love with Peanut Butter Butterfinger Cookies!
Preparation and Cooking Time
In total, preparing Peanut Butter Butterfinger Cookies will take about 1 hour, which encompasses preparation, baking, and cooling. Here’s a breakdown of the time required:
– Preparation Time: 15 minutes
– Cooking Time: 10-12 minutes
– Cooling Time: 20-30 minutes
These times may vary slightly based on your kitchen equipment and how quickly you work, but this is a solid estimate to keep in mind.
Ingredients
– 1 cup creamy peanut butter
– 1 cup granulated sugar
– 1 large egg
– 1 teaspoon vanilla extract
– 1 teaspoon baking soda
– ½ cup Butterfinger candy bars, chopped into small pieces
– ½ cup chocolate chips (optional)
Step-by-Step Instructions
Creating Peanut Butter Butterfinger Cookies is easy when you follow these straightforward steps:
1. Preheat your oven to 350°F (175°C). Line a baking sheet with parchment paper for easy cookie removal.
2. Mix Peanut Butter and Sugar: In a medium bowl, combine the peanut butter and granulated sugar. Beat until it’s creamy and well-mixed.
3. Add Egg and Vanilla: Crack the egg into the mixture and pour in the vanilla extract. Mix until fully incorporated.
4. Incorporate Baking Soda: Sprinkle the baking soda into the mixture and stir until it’s well blended.
5. Add Butterfinger Pieces: Gently fold in the chopped Butterfinger pieces, and chocolate chips if you’re using them, keeping some for topping later if desired.
6. Scoop Dough: Use a tablespoon or cookie scoop to drop rounded portions of cookie dough onto the prepared baking sheet, spacing them about 2 inches apart.
7. Bake: Place the baking sheet in the preheated oven and bake for 10-12 minutes, or until the edges are lightly golden. The centers may look a bit soft, but they will firm up as they cool.
8. Cool: Remove the baking sheet from the oven and let the cookies cool for about 5 minutes on the sheet before transferring them to a wire rack to cool completely.
9. Optional Topping: While the cookies are still warm, you can sprinkle a few extra chopped Butterfinger pieces on top for added decoration.
By following these steps, you’ll have a delicious batch of Peanut Butter Butterfinger Cookies in no time!
How to Serve
When it comes to serving your Peanut Butter Butterfinger Cookies, consider the following ideas to enhance the experience:
1. Presentation: Arrange the cookies on a decorative plate or tiered stand. A colorful backdrop can make the cookies even more appealing.
2. Accompaniments: Pair with a glass of cold milk, hot chocolate, or a scoop of vanilla ice cream for a delightful treat.
3. Portion Control: Offer smaller cookies to encourage guests to try multiple treats. This way, everyone can enjoy a variety without feeling overly indulgent.
4. Gift Packaging: Consider packaging a few cookies in a cellophane bag tied with a ribbon for a homemade gift or treat for friends and family.
5. Flavor Pairing: These cookies also work well with a sprinkle of sea salt on top, which can create a contrast to the sweetness of the Butterfinger.
Presenting your Peanut Butter Butterfinger Cookies thoughtfully will not only elevate the treat but will also impress your guests and create a memorable experience!
Additional Tips
– Choose Natural Peanut Butter: Opt for a natural or high-quality creamy peanut butter for the best flavor and texture.
– Chill Your Dough: If you find the dough too sticky, consider refrigerating it for 30 minutes before baking to make it easier to handle.
– Experiment with Add-ins: Try adding nuts or different types of chocolate to customize your cookies to your liking.
– Baking Sheet Prep: For extra crispy edges, use a non-stick baking spray or a silicone baking mat instead of parchment paper.
– Check for Doneness: Keep an eye on your cookies. They should be slightly golden at the edges but still soft in the center when you remove them from the oven.
Recipe Variation
Feel free to modify this recipe to suit your taste preferences. Here are some fun variations:
1. Peanut Butter Lovers: Increase the amount of peanut butter for a richer taste, or use crunchy peanut butter for added texture.
2. Chocolate Lovers: Add more chocolate chips or drizzle melted chocolate on top for an even more indulgent treat.
3. Nutty Addition: Toss in some chopped walnuts or pecans for a delightful crunch and nutty flavor.
4. Dairy-Free Option: Swap the chocolate chips for dairy-free ones to make these cookies suitable for a dairy-free diet.
5. Spiced Version: Add a pinch of cinnamon or nutmeg for a warm, aromatic twist to the flavor profile.
Freezing and Storage
– Storage: Keep your cookies in an airtight container at room temperature for up to one week. This ensures they stay fresh and soft.
– Freezing: You can freeze the cookies for up to three months. To freeze, lay them flat in a single layer on a baking sheet until solid, then transfer them to a freezer-safe bag. Allow them to thaw at room temperature when you’re ready to enjoy.
Special Equipment
You don’t need much to make these cookies, but here are a few handy tools:
– Mixing bowls: A medium bowl for mixing ingredients and a large bowl for combining everything.
– Baking sheets: Standard-size sheets for baking the cookies.
– Parchment paper or silicone baking mats for easy cookie removal.
– Cookie scoop or tablespoon for portioning the dough.
– Wire rack for cooling the cookies after baking.
Frequently Asked Questions
Can I use crunchy peanut butter instead of creamy?
Yes, crunchy peanut butter can add texture and a bit of crunch to your cookies.
How do I know when the cookies are done baking?
The edges should be lightly golden while the centers still appear soft. They will firm up as they cool.
Can I make these cookies gluten-free?
You can use a gluten-free flour blend in place of regular flour to accommodate gluten-free diets.
What if I don’t have Butterfinger?
You can substitute with any chocolate candy bar or try crushed cookies for a different flavor.
How long can these cookies stay fresh?
When stored properly, they should remain delicious for about a week at room temperature and up to three months in the freezer.
Conclusion
Peanut Butter Butterfinger Cookies are a delightful and easy recipe that will impress friends and family alike. Combining the rich, nutty flavor of peanut butter with the sweet, crunchy goodness of Butterfinger candy bars creates a cookie that is both fun and satisfying. Whether you’re baking for a special event or just indulging at home, this recipe is sure to become a favorite. Enjoy the process, have fun with variations, and savor every delicious bite!

Peanut Butter Butterfinger Cookies: An Amazing Ultimate Recipe
- Prep Time: 15 minutes
- Cook Time: 10-12 minutes
- Total Time: 12 minute
Ingredients
– 1 cup creamy peanut butter
– 1 cup granulated sugar
– 1 large egg
– 1 teaspoon vanilla extract
– 1 teaspoon baking soda
– ½ cup Butterfinger candy bars, chopped into small pieces
– ½ cup chocolate chips (optional)
Instructions
Creating Peanut Butter Butterfinger Cookies is easy when you follow these straightforward steps:
1. Preheat your oven to 350°F (175°C). Line a baking sheet with parchment paper for easy cookie removal.
2. Mix Peanut Butter and Sugar: In a medium bowl, combine the peanut butter and granulated sugar. Beat until it’s creamy and well-mixed.
3. Add Egg and Vanilla: Crack the egg into the mixture and pour in the vanilla extract. Mix until fully incorporated.
4. Incorporate Baking Soda: Sprinkle the baking soda into the mixture and stir until it’s well blended.
5. Add Butterfinger Pieces: Gently fold in the chopped Butterfinger pieces, and chocolate chips if you’re using them, keeping some for topping later if desired.
6. Scoop Dough: Use a tablespoon or cookie scoop to drop rounded portions of cookie dough onto the prepared baking sheet, spacing them about 2 inches apart.
7. Bake: Place the baking sheet in the preheated oven and bake for 10-12 minutes, or until the edges are lightly golden. The centers may look a bit soft, but they will firm up as they cool.
8. Cool: Remove the baking sheet from the oven and let the cookies cool for about 5 minutes on the sheet before transferring them to a wire rack to cool completely.
9. Optional Topping: While the cookies are still warm, you can sprinkle a few extra chopped Butterfinger pieces on top for added decoration.
By following these steps, you’ll have a delicious batch of Peanut Butter Butterfinger Cookies in no time!
Nutrition
- Serving Size: 12 cookies
- Calories: 150 kcal
- Fat: 7g
- Protein: 3g