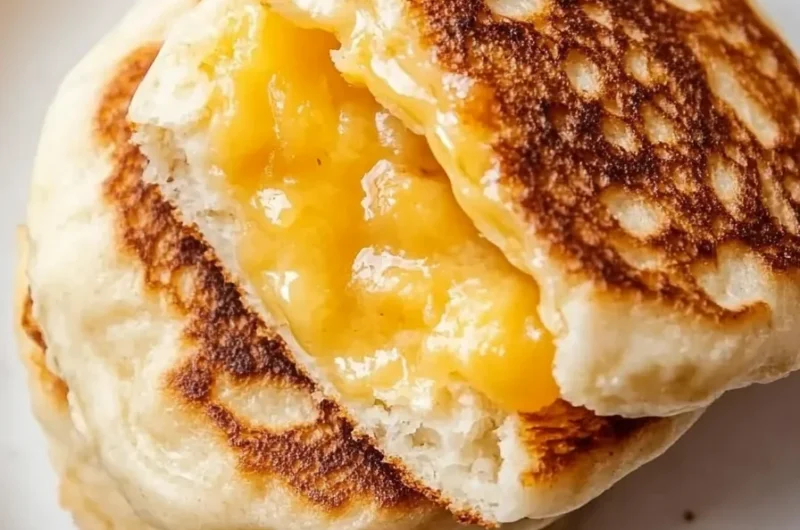
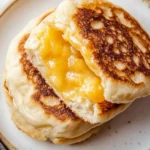
Homemade Gluten-Free English Muffins are a delightful way to enjoy breakfast or brunch. These muffins bring that perfect balance of crispy edges and a soft, chewy interior. They are perfect for toasting and slathering with butter, jam, or even a poached egg. Whether you are gluten-intolerant or simply looking to try something new, these muffins will not disappoint. With their delicious flavor and satisfying texture, you’ll wonder why you ever bought store-bought!
If you’re familiar with the delightful aroma of freshly baked English muffins wafting through your kitchen, you’re in for a treat. This recipe will guide you through the simple steps to create amazing, homemade gluten-free versions that everyone in your household will adore. From the first bite, you’ll notice the incredible texture and taste, giving the traditional muffin a run for its money!
In this article, we will explore the reasons you’ll love this recipe, preparation and cooking time, the necessary ingredients, and a step-by-step guide to creating these delightful breakfast treats. Get ready to impress yourself and your friends with a gluten-free twist on a classic favorite!
Why You’ll Love This Recipe
The beauty of Homemade Gluten-Free English Muffins lies in their deliciousness and versatility. Here are several reasons to get excited about this recipe:
1. Delicious Flavor – The made-from-scratch taste stands out. Once you try these muffins, you’ll never go back to store-bought.
2. Healthy Ingredients – You control what goes into your muffins, allowing for a healthier choice without preservatives.
3. Customizable – Egg alternatives, milk substitutes, and even added flavors like herbs or spices make these muffins unique.
4. Easy to Make – With straightforward steps, these muffins are perfect for both novice and experienced bakers.
5. Perfect Texture – Achieving that perfect chewy and crispy quality is easier than you think with the right technique.
6. Family-Friendly – This recipe will please everyone at the table, including those without gluten sensitivities.
By choosing this recipe, you’re inviting incredible flavors and exceptional texture into your breakfast routine!
Preparation and Cooking Time
Creating Homemade Gluten-Free English Muffins is a rewarding experience that does not take too long. Here’s a quick breakdown of the time you’ll need:
– Preparation Time: 15 minutes
– Resting Time: 30 minutes
– Cooking Time: 20 minutes
– Total Time: About 1 hour and 5 minutes
These times may vary depending on your expertise and kitchen setup, but they provide a solid framework to guide you in your muffin-making journey.
Ingredients
– 2 cups gluten-free all-purpose flour
– 1 cup warm milk (or dairy-free milk)
– 1 tablespoon honey or maple syrup
– 2 teaspoons instant yeast
– 1 teaspoon salt
– 1 large egg (or flax egg for vegan option)
– 1 tablespoon melted butter (or coconut oil)
– Cornmeal, for dusting
Step-by-Step Instructions
Making Homemade Gluten-Free English Muffins is straightforward. Follow these easy steps to create your own batch:
1. Activate Yeast: In a small bowl, combine warm milk and honey. Stir in yeast and let it sit for 5-10 minutes until foamy.
2. Mix Dry Ingredients: In a large bowl, whisk together the gluten-free flour and salt.
3. Combine Ingredients: Add the activated yeast mixture, melted butter, and egg to the flour. Stir until a sticky dough forms.
4. Knead Dough: On a lightly floured surface, knead the dough gently for about 1-2 minutes until well combined.
5. Let It Rise: Place the dough in a greased bowl, cover it with a clean cloth, and let it rise in a warm spot for 30 minutes.
6. Shape Muffins: After rising, turn the dough out onto the floured surface. Use your hands to flatten it to about 1 inch thick. Cut out rounds using a cookie cutter.
7. Dust the Muffins: Lightly dust both sides of the muffins with cornmeal for texture.
8. Cook on a Skillet: Preheat a non-stick skillet over medium-low heat. Cook the muffins for about 7-10 minutes per side, or until golden brown.
9. Cool Down: After cooking, let them cool on a wire rack.
By following these steps, you’ll have delicious English muffins ready to enjoy in no time!
How to Serve
Serving your Homemade Gluten-Free English Muffins can be as delightful as making them. Here are some ideas to enhance your serving experience:
1. Classic Toasting: Slice the muffins in half and toast them to perfection.
2. Spread the Joy: Slather on butter, cream cheese, or your favorite jam for a simple yet satisfying treat.
3. Top It Off: Add a poached egg, avocado, or smoked salmon for a gourmet brunch experience.
4. Savory Option: Consider adding fresh herbs, sliced tomatoes, or cheese for a delicious savory bite.
5. Pair with Beverages: Serve with your morning coffee, herbal tea, or fresh juice to complete your meal.
Remember, these muffins are versatile and can cater to a variety of tastes and preferences. Enjoy experimenting with toppings to find your perfect combination!
Additional Tips
– Use Room Temperature Ingredients: For the best results, ensure your egg and milk are at room temperature. This helps create a smoother batter.
– Experiment with Flours: While gluten-free all-purpose flour is great, blending different gluten-free flours like almond or oat can enhance flavor and texture.
– Monitor Cooking Temperature: Keep the skillet on medium-low heat to cook the muffins evenly without burning the outside, making them soft on the inside.
– Use a Cooking Thermometer: If you’re unsure about doneness, a cooking thermometer can help. The internal temperature should be around 200°F for fully cooked muffins.
– Mark with a Toothpick: Insert a toothpick into the center of a muffin; if it comes out clean, they are done.
– Keep Them Fresh: Try to consume them within a week or freeze them for longer storage. Adjust the recipe based on your needs to avoid leftovers.
Recipe Variation
Feel free to customize your Homemade Gluten-Free English Muffins! Here are a few fun ideas:
1. Herb-Infused Muffins: Add dried herbs like oregano, rosemary, or thyme to the dough for a savory twist.
2. Cheese Lovers: Incorporate shredded cheese, like cheddar or mozzarella, into the dough for a cheesy breakfast option.
3. Sweet Cinnamon Muffins: Mix in cinnamon and a touch of sugar for a sweet breakfast treat. You can even create a cinnamon sugar topping.
4. Fruit Additions: Fold in dried fruits like cranberries or raisins for a hint of sweetness and texture.
5. Nutty Texture: Add chopped nuts such as walnuts or pecans into the dough for added crunch.
6. Vegan Option: Substitute the egg with a flax egg, and use plant-based milk and oil to make it entirely vegan.
Freezing and Storage
– Storage: To keep your muffins fresh, store them in an airtight container at room temperature for up to five days. If you want to prolong their shelf life, refrigeration is an option, but they may lose some texture.
– Freezing: English muffins freeze very well. Allow them to cool completely, then place them in a single layer on a baking sheet. Freeze for about an hour, then transfer them to a freezer-safe bag. They can last up to three months in the freezer. When ready to enjoy, simply thaw at room temperature or reheat in the toaster.
Special Equipment
To ensure a smooth baking process for your Homemade Gluten-Free English Muffins, you might find the following equipment useful:
– Mixing Bowls: A few different-sized mixing bowls for combining ingredients.
– Stand or Hand Mixer: To help mix the dough consistently if you prefer not to mix by hand.
– Cookie Cutter or Round Cutter: For shaping the muffins. A 3-inch cutter works perfectly.
– Non-Stick Skillet: To cook the muffins evenly without sticking.
– Wire Rack: A cooling rack is great for allowing air to circulate around the muffins after cooking.
Frequently Asked Questions
1. Can I make these muffins smaller or larger?
Yes, you can adjust the size based on your preference for mini or big muffins. Just remember to adjust the cooking time accordingly.
2. What can I use instead of honey?
Maple syrup works beautifully as a natural sweetener for a vegan option, and it adds its lovely flavor to the muffins.
3. Are these muffins suitable for a nut-free diet?
Yes, if you choose nut-free dairy alternatives and avoid nut-based flours, they can easily fit a nut-free diet.
4. Can I double the recipe?
Absolutely! Just keep in mind that you may need to adjust the cooking time slightly due to the increased batch size.
5. Can I add more sweetener?
If you prefer sweeter muffins, you can add a tablespoon or two of sweetener while mixing the other ingredients to cater to your taste.
Conclusion
Homemade Gluten-Free English Muffins are not just for those with dietary restrictions; they cater to anyone seeking delicious breakfast options. With their fantastic flavor and adaptability, these muffins are sure to become a hit in your kitchen. Enjoy the benefits of homemade baking while treating yourself and your loved ones to a delightful breakfast experience that’s easy to prepare.
Homemade Gluten-Free English Muffins: The Amazing Ultimate Recipe
- Prep Time: 15 minutes
- Cook Time: 20 minutes
- Total Time: 35 minutes
Ingredients
– 2 cups gluten-free all-purpose flour
– 1 cup warm milk (or dairy-free milk)
– 1 tablespoon honey or maple syrup
– 2 teaspoons instant yeast
– 1 teaspoon salt
– 1 large egg (or flax egg for vegan option)
– 1 tablespoon melted butter (or coconut oil)
– Cornmeal, for dusting
Instructions
Making Homemade Gluten-Free English Muffins is straightforward. Follow these easy steps to create your own batch:
1. Activate Yeast: In a small bowl, combine warm milk and honey. Stir in yeast and let it sit for 5-10 minutes until foamy.
2. Mix Dry Ingredients: In a large bowl, whisk together the gluten-free flour and salt.
3. Combine Ingredients: Add the activated yeast mixture, melted butter, and egg to the flour. Stir until a sticky dough forms.
4. Knead Dough: On a lightly floured surface, knead the dough gently for about 1-2 minutes until well combined.
5. Let It Rise: Place the dough in a greased bowl, cover it with a clean cloth, and let it rise in a warm spot for 30 minutes.
6. Shape Muffins: After rising, turn the dough out onto the floured surface. Use your hands to flatten it to about 1 inch thick. Cut out rounds using a cookie cutter.
7. Dust the Muffins: Lightly dust both sides of the muffins with cornmeal for texture.
8. Cook on a Skillet: Preheat a non-stick skillet over medium-low heat. Cook the muffins for about 7-10 minutes per side, or until golden brown.
9. Cool Down: After cooking, let them cool on a wire rack.
By following these steps, you’ll have delicious English muffins ready to enjoy in no time!
Nutrition
- Serving Size: 6 muffins
- Calories: 180 kcal
- Fat: 5g
- Protein: 6g