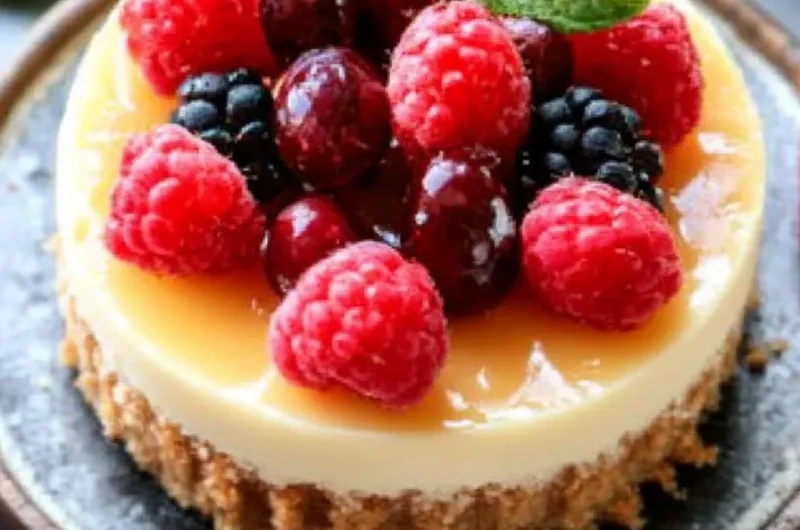
Gluten-Free Mini Cheesecakes are not only delicious but also incredibly satisfying, making them the perfect treat for any occasion. These little bites of heaven are a fantastic option for those following a gluten-free diet or simply anyone who wants to enjoy a sweet dessert without the worry of gluten. Their creamy texture combined with a crunchy crust creates a delightful contrast, catering to both the cheesecake lover and the health-conscious eater. The beauty of these mini cheesecakes lies in their adaptability, allowing you to customize flavors or toppings according to your preferences or season.
If you’re new to baking gluten-free desserts, don’t worry! This recipe is straightforward and user-friendly. Achieving that perfect balance of flavors is made simple with a few tips and tricks that will lead you to mini cheesecake perfection. You can indulge yourself and others with these delightful treats, perfect for birthdays, family gatherings, or as an after-dinner surprise. Let’s dive into what makes these Gluten-Free Mini Cheesecakes so amazing, how they are made, and what to serve them with.
In this guide, you’ll find everything you need to create these mini masterpieces. From the essential ingredients to a step-by-step preparation process, we will ensure that your baking experience is enjoyable and rewarding. Each bite of these mini cheesecakes will bring joy and satisfaction, inviting you to come back for seconds. Whether you’re celebrating a special occasion or simply satisfying a sweet tooth, these mini cheesecakes are bound to impress!
Why You’ll Love This Recipe
The extraordinary aspects of Gluten-Free Mini Cheesecakes make them an instant hit among both gluten-free and non-gluten-free dessert lovers. Here are some reasons why you will fall head over heels for this recipe:
1. Delicious Flavor – Creamy cheesecake paired with fresh toppings will tantalize your taste buds.
2. Easy to Make – The step-by-step instructions take the guesswork out of the process.
3. Perfect for Sharing – Miniature servings make these desserts easy to serve at parties or gatherings.
4. Customizable Options – You can mix and match flavors or toppings to suit your personal preferences.
5. Gluten-Free Goodness – Enjoy a sweet dessert without gluten, making it suitable for those with dietary restrictions.
6. Satisfying Portion Sizes – Mini cheesecakes provide just the right amount of sweetness, allowing for guilt-free indulgence.
With such compelling benefits, it’s clear why people rave about these mini cheesecakes! Each bite is a delightful experience, making them a must-try dessert for anyone seeking something special yet easy to make.
Preparation and Cooking Time
Creating Gluten-Free Mini Cheesecakes doesn’t take much time at all. Below is a helpful breakdown of the time needed from start to finish:
– Preparation Time: 15-20 minutes
– Cooking Time: 20-25 minutes
– Cooling Time: 1 hour
– Total Time: Approximately 1 hour and 45 minutes
These timings may vary slightly based on your experience level and kitchen tools, but this guide provides an excellent framework.
Ingredients
– 1 ½ cups gluten-free graham cracker crumbs
– ¼ cup granulated sugar
– ½ cup unsalted butter, melted
– 16 ounces cream cheese, softened
– ½ cup granulated sugar
– 2 large eggs
– 1 teaspoon vanilla extract
– ¼ teaspoon salt
– 1 cup sour cream
– Toppings of your choice (e.g., fresh fruit, chocolate drizzle, whipped cream, etc.)
Step-by-Step Instructions
Making Gluten-Free Mini Cheesecakes is simple if you follow these easy steps:
1. Preheat the Oven: Preheat your oven to 325°F (165°C) and line a muffin tin with paper liners.
2. Prepare the Crust: In a medium bowl, mix the gluten-free graham cracker crumbs, ¼ cup of sugar, and melted butter until well combined.
3. Form the Crusts: Spoon about 1 tablespoon of the crust mixture into each muffin liner. Press down firmly to create a solid base.
4. Bake the Crusts: Place the muffin tin in the preheated oven and bake for 5-7 minutes. Remove from the oven and let cool while you prepare the filling.
5. Make the Filling: In a large mixing bowl, beat together the softened cream cheese and ½ cup of sugar until smooth and creamy.
6. Add the Eggs: Gradually mix in the eggs, one at a time, blending well after each addition.
7. Add Flavorings: Stir in the vanilla extract and salt. Mix until well combined.
8. Incorporate Sour Cream: Finally, fold in the sour cream until smooth.
9. Fill the Cups: Evenly divide the cheesecake filling among the crusts in the muffin tin.
10. Bake: Bake in the oven for 20-25 minutes, or until the centers are slightly set and the edges are just beginning to turn golden.
11. Cool: Remove the mini cheesecakes from the oven and allow them to cool at room temperature for about 15 minutes before transferring them to the refrigerator.
12. Chill: Let them chill in the refrigerator for at least 1 hour, allowing them to firm up before serving.
This process will guide you through creating these delightful mini cheesecakes with ease.
How to Serve
When it comes to serving your Gluten-Free Mini Cheesecakes, consider these tips to maximize enjoyment:
1. Presentation: Use a pretty cake stand or decorative platter to showcase your mini cheesecakes.
2. Toppings: Consider topping them with fresh berries, chocolate drizzle, or a dollop of whipped cream for added flavor and texture.
3. Accompaniments: Pair your mini cheesecakes with coffee, tea, or dessert wine for a truly indulgent experience.
4. Temperature: Serve them chilled for the best flavor and texture. You can also let them sit at room temperature for a few minutes before serving.
5. Garnish: A sprinkle of gluten-free sprinkles or a mint leaf can add a pop of color to your presentation.
By paying attention to the details of how you serve these delightful treats, you ensure that each guest has an unforgettable experience.
Additional Tips
– Use Quality Ingredients: Using high-quality cream cheese and unsalted butter makes a significant difference in flavor.
– Don’t Overmix: Be cautious when mixing the filling, as overmixing may introduce too much air, causing cracks in the cheesecakes.
– Room Temperature Ingredients: Ensure the cream cheese and eggs are at room temperature for a smoother filling without lumps.
– Flavor Pairings: Consider using flavored extracts, such as almond or lemon, to elevate the taste of your mini cheesecakes.
– Allow to Cool Properly: Cooling the cheesecakes slowly keeps them from cracking and ensures a creamy texture.
Recipe Variation
Feel free to experiment with these variations for unique twists on your mini cheesecakes:
1. Chocolate Cheesecake: Add ½ cup of cocoa powder to the filling for a chocolatey version.
2. Pumpkin Spice Mini Cheesecakes: Substitute 1 cup of pumpkin puree and add 1 teaspoon of pumpkin pie spice for a festive autumn treat.
3. Berry Swirl Cheesecakes: Swirl in some pureed fresh berries into the filling before baking for a fruity burst.
4. Mocha Cheesecakes: Add 2 tablespoons of brewed coffee or espresso powder into the filling for a delightful coffee flavor.
5. Coconut Cheesecakes: Mix in shredded coconut into the filling or use coconut cream instead of sour cream for a tropical flair.
Freezing and Storage
– Storage: Keep your mini cheesecakes in the refrigerator in an airtight container. They will stay fresh for 3-4 days.
– Freezing: For longer preservation, wrap them individually and freeze for up to 2 months. To enjoy, thaw in the refrigerator overnight.
Special Equipment
To make these Gluten-Free Mini Cheesecakes, you’ll need a few essential tools:
– Muffin tin
– Paper liners for easy removal
– Mixing bowls for prepping the crust and filling
– Electric mixer or hand whisk to achieve a smooth filling
– Measuring cups and spoons for accurate ingredient quantities
Frequently Asked Questions
Can I use a different type of cheese?
Yes! Cream cheese can be substituted with mascarpone for a richer flavor, but maintain the same amount.
How do I know if they are done baking?
The centers should be slightly set but still have a jiggle. They will firm up as they cool.
Can I make these ahead of time?
Absolutely! These mini cheesecakes are excellent to prepare a day in advance, gaining flavor as they chill.
What toppings can I use?
Explore endless options such as chocolate ganache, fruit compotes, or crushed nuts to enhance textures and flavors.
How should I store leftovers?
Keep any leftovers covered in the refrigerator for optimal freshness.
Conclusion
Gluten-Free Mini Cheesecakes are a delightful dessert option that caters to a variety of preferences, making them a crowd favorite. Their creamy filling, combined with a sturdy and crunchy crust, creates a symphony of flavors guaranteed to satisfy any sweet tooth. Plus, their customizable nature makes them a versatile choice for every occasion. Whether you enjoy them plain or with an array of toppings, these mini cheesecakes bring joy and indulgence without the worry of gluten. Dive into the world of baking these little delights, and soon you’ll be delighting friends and family with every perfectly crafted bite.

Gluten-Free Mini Cheesecakes: An Incredible Ultimate Recipe
- Prep Time: 15 minutes
- Cook Time: 20-25 minutes
- Total Time: 55 minute
Ingredients
– 1 ½ cups gluten-free graham cracker crumbs
– ¼ cup granulated sugar
– ½ cup unsalted butter, melted
– 16 ounces cream cheese, softened
– ½ cup granulated sugar
– 2 large eggs
– 1 teaspoon vanilla extract
– ¼ teaspoon salt
– 1 cup sour cream
– Toppings of your choice (e.g., fresh fruit, chocolate drizzle, whipped cream, etc.)
Instructions
Making Gluten-Free Mini Cheesecakes is simple if you follow these easy steps:
1. Preheat the Oven: Preheat your oven to 325°F (165°C) and line a muffin tin with paper liners.
2. Prepare the Crust: In a medium bowl, mix the gluten-free graham cracker crumbs, ¼ cup of sugar, and melted butter until well combined.
3. Form the Crusts: Spoon about 1 tablespoon of the crust mixture into each muffin liner. Press down firmly to create a solid base.
4. Bake the Crusts: Place the muffin tin in the preheated oven and bake for 5-7 minutes. Remove from the oven and let cool while you prepare the filling.
5. Make the Filling: In a large mixing bowl, beat together the softened cream cheese and ½ cup of sugar until smooth and creamy.
6. Add the Eggs: Gradually mix in the eggs, one at a time, blending well after each addition.
7. Add Flavorings: Stir in the vanilla extract and salt. Mix until well combined.
8. Incorporate Sour Cream: Finally, fold in the sour cream until smooth.
9. Fill the Cups: Evenly divide the cheesecake filling among the crusts in the muffin tin.
10. Bake: Bake in the oven for 20-25 minutes, or until the centers are slightly set and the edges are just beginning to turn golden.
11. Cool: Remove the mini cheesecakes from the oven and allow them to cool at room temperature for about 15 minutes before transferring them to the refrigerator.
12. Chill: Let them chill in the refrigerator for at least 1 hour, allowing them to firm up before serving.
This process will guide you through creating these delightful mini cheesecakes with ease.
Nutrition
- Serving Size: 12 mini cheesecakes
- Calories: 220 kcal
- Fat: 15g
- Protein: 3g