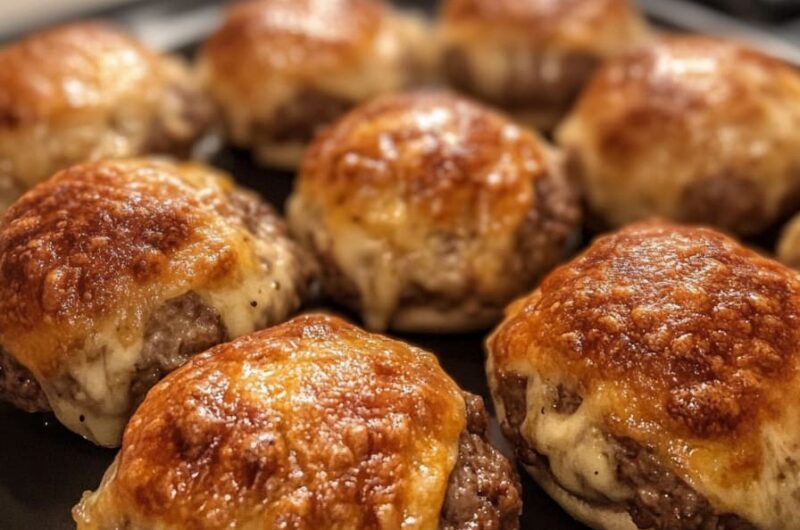
Garlic Parmesan Cheeseburger Bombs are an amazing twist on classic comfort food. These delightful bites combine the rich flavors of garlic and Parmesan with juicy cheeseburgers, all wrapped up in a soft, flaky dough. They are perfect for snacking, parties, or even a simple family dinner. It’s hard to resist the allure of cheese oozing from the sides and the fragrant aroma of garlic wafting through your kitchen.
The dish not only looks incredible but also packs a flavor punch that leaves everyone asking for seconds. Whether you’re planning a game day gathering, a casual get-together with friends, or simply indulging in a weekend treat, these bombs are sure to impress. The delicious combination of flavors and textures makes them a go-to recipe for anyone who loves a good burger.
In this guide, you will discover why Garlic Parmesan Cheeseburger Bombs are a must-try, the easy preparation and cooking time, a comprehensive list of ingredients, step-by-step instructions, and tips on how to serve them like a pro. So let’s dive right in and explore this incredible recipe that will surely become a family favorite.
Why You’ll Love This Recipe
Garlic Parmesan Cheeseburger Bombs are not only delicious but also practical and versatile. Here are some reasons you’ll fall in love with this recipe:
1. Flavor Explosion – The combination of garlic, Parmesan, and juicy cheeseburger filling creates an amazing flavor experience that’s hard to resist.
2. Easy to Make – With straightforward steps, even beginner cooks can whip these up in no time.
3. Great for Any Occasion – These bombs are perfect as appetizers at parties, lunch snacks, or part of a cozy dinner.
4. Customizable Filling – Feel free to modify the fillings by adding your favorite toppings or ingredients, such as bacon or veggies.
5. Fun for Everyone – The interactive experience of eating these cheesy bombs engages both kids and adults alike.
6. Freezer Friendly – Leftovers can be frozen and reheated later, making them a convenient option for busy weeknights.
These elements make Garlic Parmesan Cheeseburger Bombs a delightful addition to your meal rotation. Once you try them, you’ll understand why they are a hit with everyone!
Preparation and Cooking Time
Creating Garlic Parmesan Cheeseburger Bombs requires some preparation, but the rewards are worth the effort. Here’s a breakdown of the time involved:
– Preparation Time: 20 minutes
– Cooking Time: 15-20 minutes
– Total Time: 35-40 minutes
These times may vary slightly based on your cooking experience and equipment, but this guideline should help you allocate time effectively.
Ingredients
– 1 pound ground beef
– 1 tablespoon minced garlic
– 1 teaspoon onion powder
– 1 teaspoon Worcestershire sauce
– Salt and pepper, to taste
– 1 cup shredded cheddar cheese
– 1 cup grated Parmesan cheese
– 1 package of refrigerated biscuit dough
– 2 tablespoons melted butter
– 1 tablespoon dried parsley (optional)
Step-by-Step Instructions
Making Garlic Parmesan Cheeseburger Bombs can be a fun and straightforward process when you follow these steps:
1. Preheat Oven: Preheat your oven to 375°F (190°C) and line a baking sheet with parchment paper.
2. Cook the Beef: In a large skillet, add the ground beef and heat over medium-high. Cook until browned, breaking it up with a spatula.
3. Add Garlic and Seasoning: Stir in the minced garlic, onion powder, Worcestershire sauce, and season with salt and pepper. Cook for an additional 2-3 minutes until fragrant.
4. Mix in Cheese: Remove the skillet from the heat and stir in the shredded cheddar cheese and half of the grated Parmesan cheese until melted and well combined.
5. Prepare Biscuits: Open the biscuit dough and separate it into individual biscuits.
6. Fill the Biscuits: Take each biscuit and flatten it slightly. Add a generous tablespoon of the cheeseburger mixture in the center.
7. Wrap the Filling: Gather the edges of the biscuit around the filling and pinch to seal completely. Place the filled biscuits on the prepared baking sheet seam-side down.
8. Brush with Butter: Brush the tops of the bombs with melted butter and sprinkle with the remaining Parmesan cheese and optional parsley.
9. Bake: Place in the oven and bake for 15-20 minutes or until golden brown.
10. Cool and Serve: Once baked, allow to cool for a few minutes before serving.
These step-by-step instructions will help ensure a successful preparation of these flavorful bombs.
How to Serve
To create the best experience with your Garlic Parmesan Cheeseburger Bombs, consider the following serving suggestions:
1. Dipping Sauces: Offer a variety of dipping sauces such as ketchup, mustard, ranch dressing, or a spicy aioli to enhance their taste.
2. Presentation: Arrange the cheeseburger bombs on a stylish platter or serve them in individual portions for a visually appealing display.
3. Garnish: Consider garnishing with fresh parsley or a sprinkle of additional Parmesan cheese for an elegant touch.
4. Sides: Pair them with a fresh salad or crispy fries to make a complete meal.
5. Beverage Pairing: Serve alongside your favorite drinks, whether that’s iced tea, soda, or a light beer, to complement the flavors.
By following these serving suggestions, you elevate the overall dining experience and make your Garlic Parmesan Cheeseburger Bombs a hit at any gathering!
Additional Tips
– Use Fresh Garlic: The flavor of fresh garlic is much stronger than garlic powder, enhancing the overall taste of the bombs.
– Don’t Overfill: Be careful not to overfill the biscuits, as it might make sealing difficult and cause them to burst during baking.
– Experiment with Cheese: Try different cheese types, such as pepper jack or mozzarella, for varying flavor profiles.
Recipe Variation
Feel free to get creative by trying these variations:
1. Spicy Twist: Add chopped jalapeños or hot sauce to the beef mixture for some heat.
2. Veggie Loaded: Incorporate diced onions, bell peppers, or mushrooms into the beef mixture to increase the veggie content.
3. Cheeseburger Deluxe: Top the bombs with crispy bacon bits for an extra layer of flavor.
Freezing and Storage
– Storage: Store any leftovers in an airtight container in the refrigerator for up to 3 days.
– Freezing: You can freeze the unbaked bombs. After wrapping them individually, place them in a freezer-safe bag for up to 2 months. No need to thaw before baking; just adjust the baking time accordingly.
Special Equipment
You won’t need much beyond the basics to make Garlic Parmesan Cheeseburger Bombs:
– Skillet: For cooking the beef mixture.
– Baking Sheet: To place the filled bombs for baking.
– Parchment Paper: To prevent sticking on the baking sheet.
– Basting Brush: For applying butter on top of the bombs before baking.
Frequently Asked Questions
Can I use a different type of meat?
Yes, ground turkey or chicken can be used as a leaner alternative.
How do I know if the bombs are done baking?
They should be golden brown on top when finished baking.
Can I make these in advance?
Yes! You can prepare the filling the day before, store it in the fridge, and assemble the bombs right before baking.
What if I don’t have biscuit dough?
You can substitute with crescent roll dough or even homemade dough if you’re feeling adventurous.
Do these bombs reheat well?
Absolutely! Reheat in the oven for a few minutes to maintain their texture instead of using a microwave.
Conclusion
Garlic Parmesan Cheeseburger Bombs are a crowd-pleasing dish that beautifully blends the classic flavors of cheeseburgers with the irresistible taste of garlic and Parmesan. Their delightful chewiness and cheesy filling ensure they’ll be a hit at any gathering. Whether it’s game day, a family dinner, or simply a comforting snack, this recipe is guaranteed to impress everyone at the table. You’ll definitely want to make these again and again!

Garlic Parmesan Cheeseburger Bombs: An Incredible Ultimate Recipe
- Prep Time: 20 minutes
- Cook Time: 15-20 minutes
- Total Time: 18 minute
Ingredients
– 1 pound ground beef
– 1 tablespoon minced garlic
– 1 teaspoon onion powder
– 1 teaspoon Worcestershire sauce
– Salt and pepper, to taste
– 1 cup shredded cheddar cheese
– 1 cup grated Parmesan cheese
– 1 package of refrigerated biscuit dough
– 2 tablespoons melted butter
– 1 tablespoon dried parsley (optional)
Instructions
Making Garlic Parmesan Cheeseburger Bombs can be a fun and straightforward process when you follow these steps:
1. Preheat Oven: Preheat your oven to 375°F (190°C) and line a baking sheet with parchment paper.
2. Cook the Beef: In a large skillet, add the ground beef and heat over medium-high. Cook until browned, breaking it up with a spatula.
3. Add Garlic and Seasoning: Stir in the minced garlic, onion powder, Worcestershire sauce, and season with salt and pepper. Cook for an additional 2-3 minutes until fragrant.
4. Mix in Cheese: Remove the skillet from the heat and stir in the shredded cheddar cheese and half of the grated Parmesan cheese until melted and well combined.
5. Prepare Biscuits: Open the biscuit dough and separate it into individual biscuits.
6. Fill the Biscuits: Take each biscuit and flatten it slightly. Add a generous tablespoon of the cheeseburger mixture in the center.
7. Wrap the Filling: Gather the edges of the biscuit around the filling and pinch to seal completely. Place the filled biscuits on the prepared baking sheet seam-side down.
8. Brush with Butter: Brush the tops of the bombs with melted butter and sprinkle with the remaining Parmesan cheese and optional parsley.
9. Bake: Place in the oven and bake for 15-20 minutes or until golden brown.
10. Cool and Serve: Once baked, allow to cool for a few minutes before serving.
These step-by-step instructions will help ensure a successful preparation of these flavorful bombs.
Nutrition
- Serving Size: 8 bombs
- Calories: 320 kcal
- Fat: 20g
- Protein: 18g


